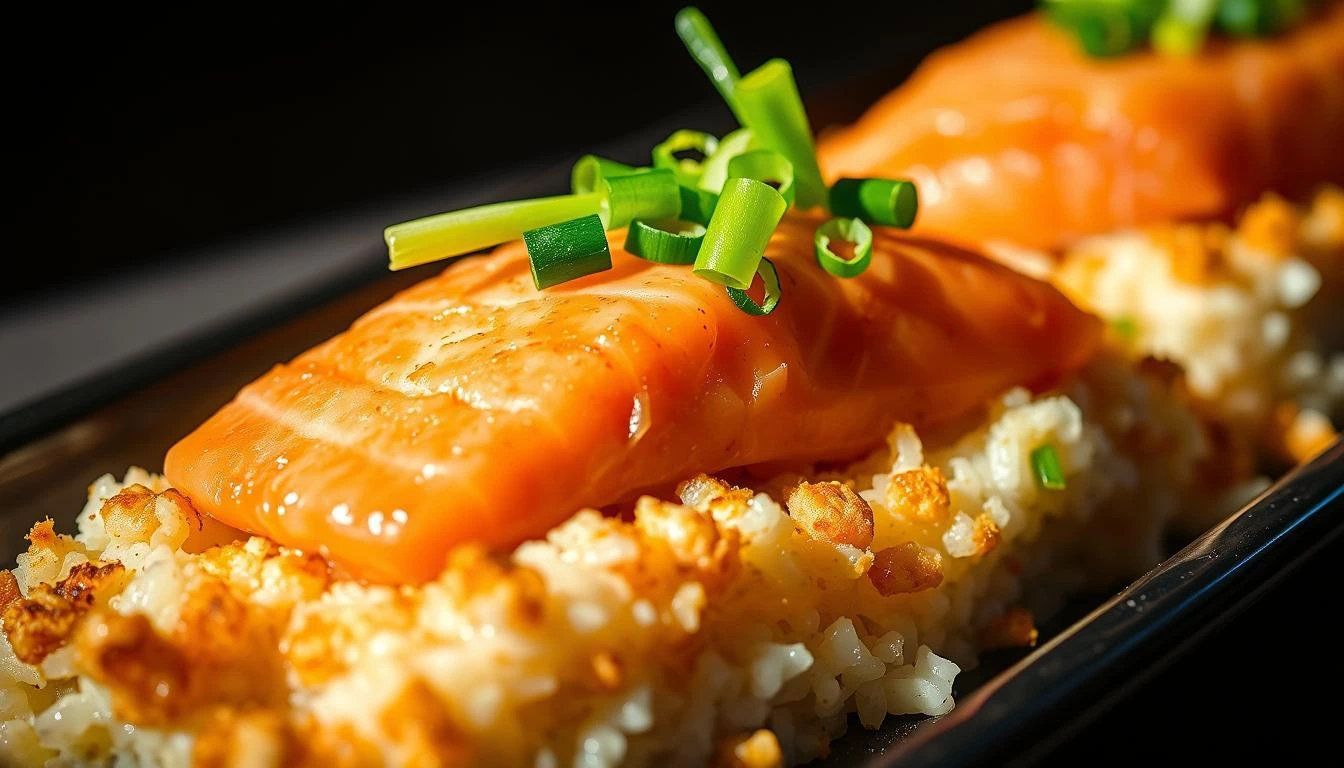
If you’re a fan of sushi but crave something a little more comforting and easy to make, then this sushi bake recipe with salmon is the perfect dish for you. Imagine all the rich flavors of your favorite sushi, baked into a warm, gooey casserole that will have everyone at the table asking for seconds. It’s a crowd-pleasing dish that combines the best of fresh salmon, creamy layers, and crispy nori in every bite. Whether you’re hosting a dinner or just want a delicious meal to satisfy your cravings, this recipe is both versatile and easy-to-make. Plus, you can customize it to suit your tastes—whether you love a little extra heat or prefer it milder, this sushi bake is made to impress. Ready to dive in? Let’s get started!
Table of Contents
Why This Sushi Bake Recipe Salmon Will Wow You
When it comes to creating a dish that’s both delicious and easy-to-make, this sushi bake recipe with salmon checks all the boxes. Here’s why this recipe will quickly become a favorite in your kitchen:
- Flavor-packed and comforting: Unlike traditional sushi, which requires precision, this sushi bake takes the best of sushi flavors and wraps them in a warm, creamy casserole. With layers of fresh salmon, creamy mayo, and a hint of umami, it’s the ultimate comfort food with a sushi twist.
- A perfect crowd-pleaser: Whether you’re hosting a dinner party, celebrating a special occasion, or just treating yourself, this dish will satisfy everyone at the table. Its mix of familiar sushi ingredients in a new, accessible format makes it a hit with both sushi lovers and beginners alike.
- Quick and easy: No need to roll individual pieces of sushi or worry about precise cutting. This sushi bake simplifies the process by allowing you to assemble everything in one dish, making it ideal for busy weeknights or last-minute gatherings.
- Customizable to your taste: Want to add a little spice? A dash of sriracha will elevate the flavor. Prefer a milder version? Simply adjust the mayonnaise and add a little more soy sauce for extra depth. You can even swap out the salmon for another fish, like tuna, or make it vegetarian with avocado.
- Healthy and satisfying: This sushi bake gives you the satisfaction of eating sushi but with added comfort. The salmon provides a good source of healthy fats and protein, and the dish is customizable to include nutritious ingredients like avocado, cucumber, or carrots.
So, whether you’re craving sushi in a new form or looking for an easy yet impressive dish to share, this sushi bake with salmon is sure to blow your mind with its amazing flavors and versatility. Ready to give it a try? Let’s get started!
Ingredients
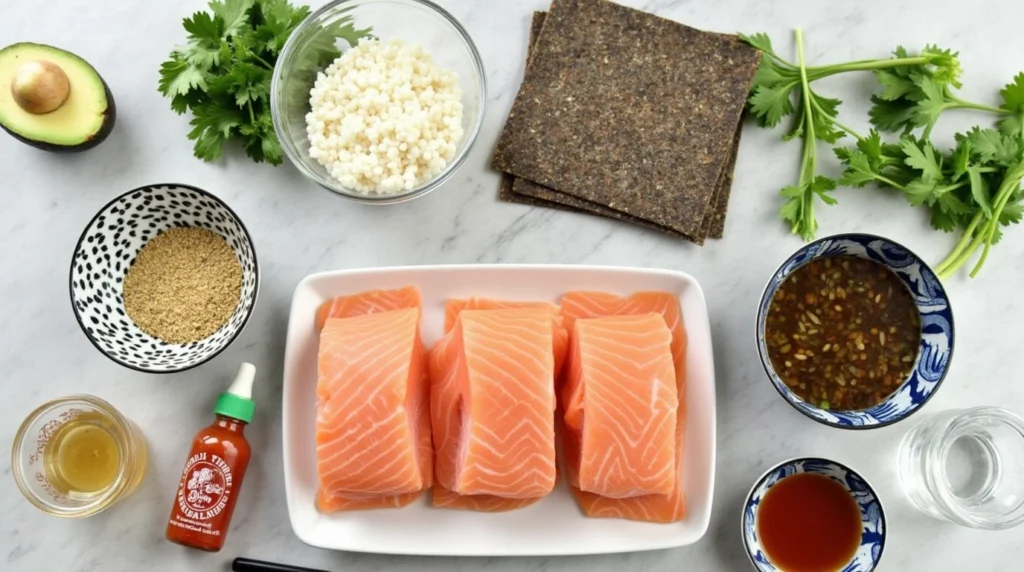
For this sushi bake recipe with salmon, you’ll need just a few simple ingredients to create a delicious and satisfying meal. Below is everything you’ll need, along with some optional variations to make this dish your own.
Core Ingredients:
- Fresh salmon fillet (about 1 lb): Fresh, high-quality salmon is key for this recipe. It will bake beautifully and provide a rich, flavorful base. If you prefer, you can substitute with tuna or even crab for a different twist.
- Sushi rice (2 cups): The star of your sushi bake! Sushi rice is sticky and holds together perfectly, making it ideal for layering in this casserole. Make sure to rinse the rice thoroughly before cooking to remove excess starch.
- Nori sheets (3-4 sheets): These give your sushi bake that authentic sushi flavor. You’ll tear them into smaller pieces to layer in the dish. If you’re gluten-sensitive, be sure to check for certified gluten-free nori.
- Cream cheese (8 oz): A key ingredient for adding creaminess and richness to the bake. You can opt for a light version or a dairy-free cream cheese if you’re looking for a healthier or non-dairy alternative.
- Mayonnaise (½ cup): Regular mayo or Japanese mayo (like Kewpie) will add a touch of tanginess and creaminess. Japanese mayo is slightly sweeter and richer, which gives the dish an extra flavor boost.
- Soy sauce (2 tbsp): For that savory, umami flavor. You can use tamari for a gluten-free version or coconut aminos for a paleo-friendly option.
- Fish roe (1-2 tbsp): Optional, but it adds a beautiful pop of color and texture. You can use masago (capelin roe) or tobiko (fish roe).
- Green onions (for garnish): A handful of chopped green onions adds a fresh, vibrant finish to the dish.
Optional Ingredients & Variations:
- Sriracha (1 tbsp): If you like a little heat, drizzle some sriracha into the mayo mixture for a spicy kick.
- Avocado: Add a few slices of creamy avocado on top before baking for a richer flavor and extra smooth texture.
- Cucumber: For a crunchy contrast, serve with thin cucumber slices on the side or fold it into the layers.
- Sesame seeds: Toasted sesame seeds are a great garnish for added flavor and crunch.
By using these ingredients, you’ll create a sushi bake that’s not only bursting with flavor but also beautifully layered with textures. Now, let’s move on to how to assemble everything into this delicious, melt-in-your-mouth dish!
Instructions
Now that you have all your ingredients ready, it’s time to assemble your sushi bake recipe with salmon! Don’t worry, this is a simple and fun process that requires just a few steps to create a show-stopping dish. Let’s dive in!
Step 1: Prepare the Sushi Rice
Start by cooking your sushi rice.
- Rinse 2 cups of sushi rice under cold water until the water runs clear. This helps remove excess starch and ensures your rice has the right texture.
- Cook the rice according to the instructions on the package (typically 1:1 ratio of rice to water). For the best results, use a rice cooker if you have one.
- Once cooked, allow the rice to cool for about 10-15 minutes. While it’s cooling, mix 2 tablespoons of rice vinegar, 1 tablespoon of sugar, and 1 teaspoon of salt in a small bowl until the sugar dissolves. Stir this mixture gently into your cooled rice to give it that signature sushi flavor. Set aside.
Step 2: Cook the Salmon
While your rice is cooling, prep the salmon.
- Preheat your oven to 350°F (175°C).
- Season your fresh salmon fillet with a pinch of salt and pepper.
- Place the salmon on a baking sheet lined with parchment paper and bake for about 12-15 minutes, or until the salmon is fully cooked and flakes easily with a fork.
- Once done, remove the skin (if it hasn’t been removed already) and flake the salmon into bite-sized pieces.
Step 3: Make the Creamy Sauce
- In a bowl, mix ½ cup of mayonnaise with 1 tablespoon of soy sauce and 1 teaspoon of sriracha (optional for heat). This creamy sauce will add a rich, tangy flavor to the sushi bake.
- Stir in the flaked salmon and mix until well-coated. This is where the magic happens—the combination of creamy mayo and tender salmon will make your sushi bake irresistible.
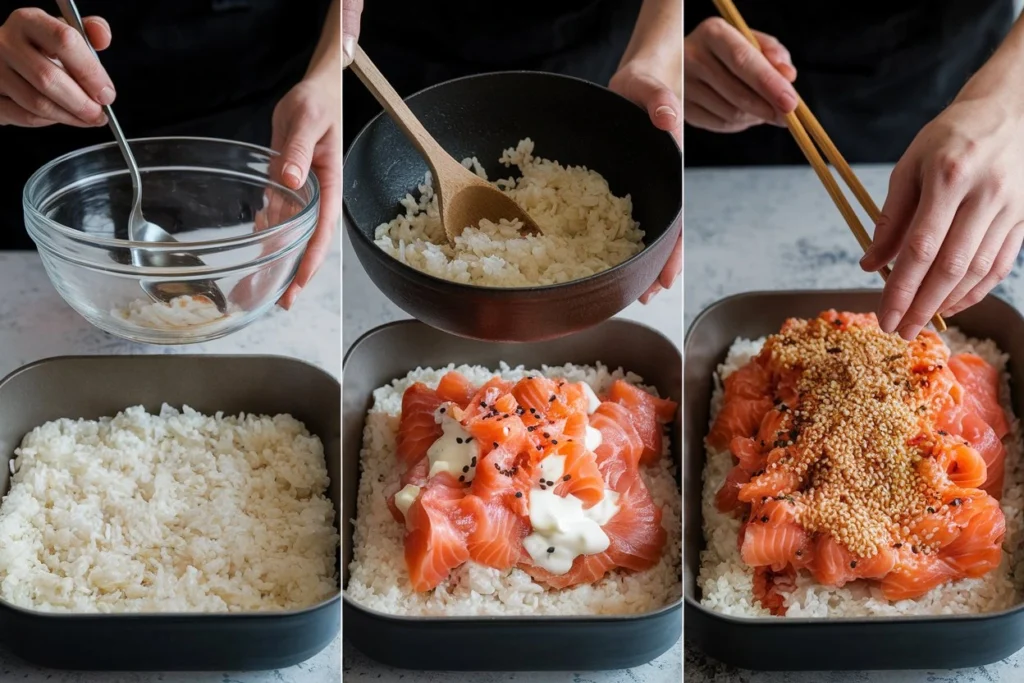
Step 4: Assemble the Sushi Bake
- In a baking dish (about 8×8 inches), start by spreading a layer of your prepared sushi rice on the bottom. Press it gently with a spatula to make sure it’s even and compact.
- Tear the nori sheets into small pieces and scatter them over the rice. This adds that signature sushi taste.
- Evenly spread the creamy salmon mixture over the nori and rice. Smooth it out with a spatula, making sure every bite will be filled with the delicious flavors.
- For a little extra touch, sprinkle fish roe (masago or tobiko) over the top. It’s completely optional, but it adds texture and color.
Step 5: Bake It
- Place your sushi bake in the preheated oven and bake for about 15-20 minutes, or until the top is golden and bubbly. You can broil it for the last 2-3 minutes for an extra crispy top.
- Remove from the oven and let it cool for a few minutes before slicing.
Step 6: Garnish and Serve
- Garnish with freshly chopped green onions for a burst of color and freshness.
- Serve with optional sides like thinly sliced avocado or a drizzle of soy sauce.
That’s it! You’ve just made a sushi bake that’s bursting with flavor and texture. It’s creamy, savory, and just the right amount of crunchy. Ready to dig in? Enjoy every bite!
Pro Tips and Variations
This sushi bake recipe with salmon is a breeze to make, but I’ve got some pro tips and variations that will help you elevate the dish and make it even more versatile. Whether you’re looking to tweak the flavor or adjust the recipe to fit your dietary needs, these tips will help you get the best results every time!
Pro Tips for Perfect Sushi Bake:
- Rice texture is key: Make sure your sushi rice is slightly sticky but not mushy. The rice should hold together without being too clumpy. If you’re using a rice cooker, it’ll take the guesswork out of it!
- Use the right mayo: While regular mayo works just fine, I highly recommend using Japanese mayo (like Kewpie) if you can find it. It’s richer and creamier, which will add a subtle sweetness that perfectly complements the salmon.
- Don’t skip the cooling step: After cooking the rice, let it cool for a bit before mixing it with the vinegar. This will prevent the rice from becoming too wet or mushy when you add it to the baking dish.
- Baking time matters: Keep an eye on your bake as it cooks. Every oven is different, but the key is to bake until the top is golden and the edges are crispy. If you like a super-crispy top, pop it under the broiler for 2-3 minutes at the end of baking!
Variations to Try:
- Spicy version: For a spicy twist, add more sriracha to the creamy mayo mixture. You can also drizzle extra sriracha on top after baking for an added kick.
- Tuna swap: If you’re not a fan of salmon or want to try something different, tuna is a great substitute. Use the same preparation method—just make sure it’s fresh and high-quality!
- Vegetarian version: Looking for a plant-based option? Swap the fish for avocado or mango for a refreshing and creamy alternative. You can also add shredded carrots or cucumber for extra crunch.
- Add a crunch factor: For extra texture, sprinkle toasted sesame seeds over the top before baking, or add some crunchy tempura flakes after it’s done for a bit of crispiness.
Make-Ahead Tips:
- Prep in advance: You can prepare the sushi bake ahead of time! Simply assemble everything up to the point of baking, cover it tightly with plastic wrap, and store it in the fridge. When you’re ready to eat, just pop it in the oven to bake and enjoy!
- Leftovers: If you have leftovers (though I doubt it!), you can easily store them in an airtight container for up to 2-3 days. Reheat in the oven at 350°F for about 10 minutes to keep the top crispy.
With these tips and variations, you can customize your sushi bake to fit your tastes and preferences. It’s the perfect dish to make your own—whether you like it spicy, creamy, or full of crunch! Now that you know the secrets, let’s move on to serving your delicious creation!
Serving Suggestions
Now that you’ve created your mouthwatering sushi bake with salmon, it’s time to think about how to serve it! This dish is so versatile, and there are plenty of ways to pair it with sides or garnishes to elevate your meal even more. Let’s dive into some serving suggestions that will complement your sushi bake perfectly!
1. Pair with Fresh Sides
- Miso soup: A warm bowl of miso soup is a classic and comforting pairing for your sushi bake. The savory broth with a hint of umami will complement the richness of the baked salmon and creamy mayo.
- Crispy seaweed salad: Add a refreshing crunch with a seaweed salad. The light, tangy flavor balances out the richness of the sushi bake, and the texture contrasts beautifully with the soft salmon layers.
- Pickled ginger: Serve pickled ginger on the side to cleanse your palate between bites. Its sharp, slightly sweet flavor provides a great contrast to the creamy bake.
2. Garnish for Extra Flavor
- Avocado slices: For an extra creamy touch, top your sushi bake with sliced avocado right before serving. The buttery texture pairs perfectly with the warm casserole.
- Chopped green onions: A sprinkle of fresh green onions will brighten up the dish with color and a burst of freshness. It adds a mild onion flavor that balances out the richness.
- Sesame seeds: Lightly toasted sesame seeds can be sprinkled on top for added texture and flavor. These little seeds provide a nice nutty finish.
3. Serve as an Appetizer or Main Course
- Appetizer: If you’re serving this sushi bake as an appetizer, slice it into smaller squares or bite-sized pieces. It’s perfect for a sushi-inspired starter at any gathering.
- Main course: Serve the sushi bake in larger portions as a filling main dish. Pair it with a side of steamed edamame or cucumber salad for a light, healthy addition to the meal.
4. Drinks to Pair With
- Sake: If you’re feeling fancy, pair your sushi bake with a chilled glass of sake. Its subtle flavors enhance the sushi-inspired dish while keeping the overall experience light and refreshing.
- Green tea: For a non-alcoholic option, serve a hot cup of green tea alongside the meal. Its earthy notes are the perfect counterpoint to the rich, creamy sushi bake.
Whether you’re hosting a casual dinner with friends or preparing a special meal for your family, these serving suggestions will ensure your sushi bake shines even more. From adding light, fresh sides to garnishing with tasty toppings, your dish will be as visually appealing as it is delicious! Ready to enjoy your creation? Bon appétit!
See more: Salmon Poke Recipe You’ll Fall in Love With
Mediterranean Salmon Recipe Everyone Will Love
Delicious Salmon Rice Recipe: Quick & Easy Meal
Conclusion
Congratulations! You’ve just created a delicious sushi bake with salmon that’s sure to impress your guests and satisfy your cravings. This dish is the perfect balance of creamy, savory, and slightly crispy flavors, all baked together into one comforting casserole. Whether you’re an experienced home cook or just starting out in the kitchen, this recipe is simple, flexible, and a total crowd-pleaser.
FAQs
1. Can I use cooked salmon instead of raw?
Yes! If you prefer using cooked salmon, you can absolutely substitute it. Just make sure it’s flaky and fully cooked before mixing it with the mayo sauce. Leftover salmon works great in this recipe as well!
2. Can I make this sushi bake gluten-free?
Definitely! To make your sushi bake gluten-free, you can use tamari instead of soy sauce and ensure that your nori sheets are gluten-free. Many nori brands are naturally gluten-free, but it’s always a good idea to double-check the packaging to be sure.
3. What other fish can I use besides salmon?
This sushi bake is super versatile! If you’re not a fan of salmon, you can use tuna, crab, or even shrimp. Just make sure whatever protein you use is cooked and flaked for easy layering.
4. Can I prepare the sushi bake in advance?
Yes, you can prepare the sushi bake ahead of time! Assemble the dish up to the point of baking, cover it tightly with plastic wrap or foil, and store it in the fridge. When you’re ready, just pop it in the oven and bake as directed. It’s a great option for meal prep or when entertaining guests.
5. How do I store leftovers?
Leftovers can be stored in an airtight container in the fridge for 2-3 days. To reheat, place it in a preheated oven at 350°F for 10-15 minutes or until heated through. You can also warm it up in the microwave, but the oven will help retain the crispiness on top.
6. Can I make this sushi bake vegetarian or vegan?
Absolutely! To make a vegetarian or vegan version of this dish, swap out the salmon for ingredients like avocado, mango, or tofu. For a vegan mayo option, use a plant-based alternative to regular mayo, and you’re good to go!
7. Can I add more toppings?
Yes! Feel free to get creative with your toppings. Some tasty additions include crispy tempura flakes, shredded nori, or a drizzle of eel sauce for added depth. You can also top it with some sesame seeds or a sprinkle of chopped cilantro for a fresh, herbal kick.
8. Can I freeze sushi bake?
While it’s best fresh, you can freeze the assembled, uncooked sushi bake. Just wrap it tightly in plastic wrap and foil, and it will keep in the freezer for up to 2 months. When you’re ready to bake, let it thaw in the fridge overnight and bake it as usual.